How to Tile a Splashback
29 August 2026 Joe HartleyBeginnerHalf a day to a day19 comments
Tools
- Spirit level and tape measure
- Notched trowel (6 mm for most wall tiles)
- Tile spacers
- Manual tile cutter
- Tile adhesive and grout
- Grout float and sponge
- Sanitary silicone
- Masking tape and pencil
A kitchen splashback is the friendliest first tiling job: a short run above the worktop, light tiles, and no shower water load. Success comes down to a true bottom row, even joints, and a clean silicone line where tile meets worktop.
This guide covers ceramic or porcelain wall tiles on a sound, dry wall. If the old tiles are staying, check when tiling over existing tiles is OK first.
Kitchen wall or wet corner?
| Situation | What to do |
|---|---|
| Painted plaster or plasterboard, sound and dry | Tile straight on after degreasing and a light key if glossy |
| Soft, dusty plaster or blown patches | Repair and dry first; adhesive will not hold on chalk |
| Area next to a sink that gets heavy splash | Same method; use a flexible adhesive if the board can move slightly |
| Full wet room or shower wall | Wrong job. Use how to tile a bathroom wall or how to tile a shower enclosure |
Measure height from worktop to your planned top edge (often to the underside of wall units, or a neat band of two or three courses). Buy 10% extra for cuts and breakages. Mix boxes so shade batches blend.
Socket faceplates: Isolate power at the consumer unit if you need to remove faceplates. Undo the plate, tile close with neat cuts, then refit so the plate sits proud of the tile face. Do not bury live terminals under adhesive.
Kit and materials
| Item | Notes |
|---|---|
| Wall tiles | Ceramic is fine for most splashbacks; porcelain also works |
| Ready-mixed or powder adhesive | Powder often grips better on slightly uneven plaster |
| Notched trowel | 6 mm square notch is typical for small to mid wall tiles |
| Spacers | Match your joint (often 2–3 mm) |
| Manual cutter | Straight cuts; nippers for nibbles at sockets |
| Grout | Cementitious wall grout; colour that hides kitchen grease |
| Sanitary silicone | Colour-matched to grout or worktop; not bathroom decorator’s caulk |
Setting out the field
- Wipe the wall with sugar soap. Rinse and dry. Sand gloss paint so adhesive has a key.
- Mark a horizontal pencil line at the height of one full tile plus spacer above the worktop. Check it with a spirit level. Worktops are rarely dead level; your first tile row must be, or every joint above will wander.
- Dry-lay a course along the worktop (on spacers or a temporary batten) to see end cuts. Aim for equal cut tiles at both ends of a run, not a 15 mm strip at one end and a full tile at the other.
- If you use a temporary timber batten screwed to the wall on the pencil line, it supports the first row while adhesive grabs. Remove it after the adhesive has set and fill the bottom joint later with silicone, not grout, against the worktop.
Step-by-step
1. Mix or open the adhesive
Powder adhesive: mix to a stiff paste that holds ridges from the notched trowel. Ready-mixed: stir and work in small areas so it does not skin.
2. Comb adhesive on the wall
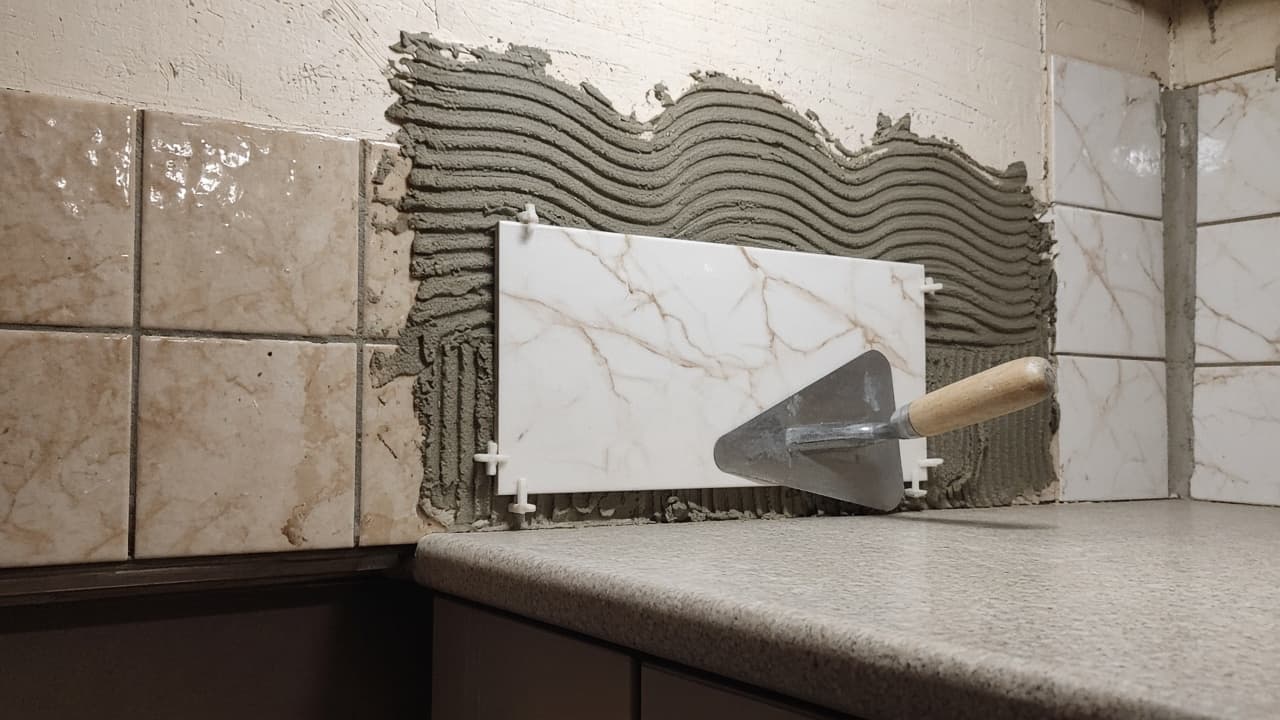
Spread a patch big enough for three or four tiles. Hold the notched trowel at about 45 degrees so ridges are even. Do not butter blobs onto the tile only and hope; hollow beds show as drumming later.
3. Set the first row
Press each tile into the ridges with a slight twist. Seat against spacers. Check the face with a short spirit level across two tiles. Wipe squeeze-out from joints before it skins.
4. Build upwards
Work in courses. Keep joints aligned with spacers. At external corners or open ends, fit tile trim if the tile edge is unfinished, or plan a cut so the glazed edge faces out.
5. Cut around sockets and returns
Mark cuts from the face. Score and snap straight cuts on the manual cutter. For L-shapes around a socket box, cut the waste with careful nips or a wet saw if you have one. Leave a couple of millimetres clearance; the faceplate hides the gap.
6. Cure, then grout
Leave adhesive to set for the time on the bag (often overnight). Remove spacers. Force grout into joints with a float at a diagonal. Wipe with a damp sponge, rinsing often. Buff haze the next day.
7. Silicone the worktop junction
Mask both sides. Run a continuous bead of sanitary silicone between the bottom tile edge and the worktop. Tool smooth. This joint moves and gets wet; grout cracks here.
Mistakes that show on a splashback
- Starting hard against an out-of-level worktop so the top edge climbs like a staircase.
- Leaving a skinny sliver cut at one end of the run because you started with a full tile at the “easy” end.
- Filling the worktop gap with grout. It cracks and traps grease.
- Spreading adhesive over a whole wall then racing the skin time. Work in patches.
- Refitting socket plates before the tile face is clean. Haze under chrome looks permanent.
When to call a tiler
Call a tiler if the wall is badly out of plane, plaster is soft over a large area, or you need large-format porcelain with tight joints and no lippage. Call an electrician (Part P where required) if circuits need moving or new boxes; do not DIY notifiable electrical work.
Related: tile a bathroom wall, tile a shower enclosure, remove old tiles without wrecking the wall, tile over existing tiles when OK.
FAQ
How high should a kitchen splashback be?
Common UK heights are from worktop to the underside of wall units, or a fixed band of about 300–600 mm. Match neighbouring runs and unit heights so the top edge looks intentional.
Do I need to tank a kitchen splashback?
No. Ordinary wall adhesive and a silicone seal at the worktop are enough for splash. Tanking belongs in showers and wet rooms, not behind a cooker or sink splashband.
Can I tile a splashback over wallpaper?
No. Strip paper back to a sound painted or plastered face. Wallpaper softens under adhesive and the tiles peel.
How long before I can use the kitchen again?
Light use after grout has firmed (often 24 hours). Keep heavy steam and aggressive cleaning off for a couple of days, or as the adhesive and grout bags state.
19 comments